Mother Nature

This quilt required a lot of different techniques that I have learned along the way. I still have a lot more to learn but I will take you step by step on this process.

Above ⬆️ you can see that I started out by tracing out an image of a face onto muslin. Then I cut out small pieces of fabric flowers and leaves to start shading in the face. This is a technique I learned from famed quilter, Susan Carlson, via her book, Serendipity.

My working piece is laid on top of foam core so I can push the pins into place as I continue to shade and collage the face in with my many cut fabric flowers and butterflies. I’m constantly changing and rearranging the flowers around until I think I have it right.

When I feel the piece is complete I start to glue the flowers down onto the muslin. I also use a product called Fray Block by Tailor to keep the fabric from fraying as this is a raw edge technique. This portrait is not glued down to the edge. This was done purposely so I can cut it out from the muslin and lay it onto my quilted background once that is completed.

The background to my Mother Nature quilt, of course, will be trees. The tree branches is a gold and white fabric that I bought from Joann Fabric because I thought it resembled the bark of a birch tree. For the leaves, I decided to do a confetti technique. It’s a pretty easy technique that I learned from watching a few YouTube videos. I laid my darker colors down first then added my lighter colors. I used a purple tulle to lay over the confetti leaves to stabilize it before quilting it down. I didn’t use all my confetti pieces so I bagged them individually to use for a later project. (⬆️ See the muffin tin I used to keep the confetti pieces separate.

Next came the hair. I know, it’s a shockingly a lot of dark color. I was hesitant at first about it, but I proceeded forward. I quilted a free motion feather technique that I also learned from watching YouTube videos (what can’t you learn from watching YouTube videos). The outside edge of the hair I sewed on purple emery floss to give it a pop of color. The thread I used for the feather quilting was also purple, however I didn’t like the purple color veining down the center of the feathers so I used my black inktense colored pencil to darken it in.

I cut out more of the butterflies and added them into her hair. I thought that this added more flow and depth to her hair. I added a white tulle to only her face to soften it a bit before I began the final quilting process.

⬆️ Here is a closer look at the free motion quilting I did on her face. As you can see, I free motion quilted in the natural contours of her face. In this photo you can also see a close up of the branches. I used a gold thread and a squiggly line to appliqué the branches. It was a bit frustrating as the gold thread isn’t strong and tended to break easily if I went too fast.

I decided on a 1/4 inch boarder of a matching colored fabric as the background. It measures 18×41 inches. Mother Nature now belongs to my daughter. She tells me that she loves it and has it hanging in her foyer and that makes me smile.

Designer Owl Pillows 🦉

This will be a simple short blog for a simple short project.

These two owl pillows were made with a simple design of raw edge appliqué. I drew out the pattern onto freezer paper and ironed the freezer paper onto my upholstery fabric. I cut the pattern out using my pinking sheers. I then removed the freezer paper and ironed the cut out fabric unto a fusible webbing. Once the design was ironed and fused together I sewed the edges about 1/4 inch using just a straight stitch. All the fabric is upholstery and since it is raw edge it will fray a bit. The fraying causes more of a distressed unfinished look which for this particular design I wanted. Both pillows were made of the same fabric, just in reverse for the eyes and body. The added trim, the applied buttons and embroidery give both pillows a unique look.

In the top design the eyes were made with two buttons on top of each other. All the buttons were purchased at JoAnn fabric using a coupon (of course). The beak on the top pillow was found in a package of buttons in the “steam punk” section. Gotta love steam punk. The bottom pictured pillow I tried my hand at embroidery. Both pillows are 8″x8″ and stuffed with Poly-fil. You can make this design any size you want. I kept it small because I used fabric I had on hand. This is an easy weekend project for a couple of cute designer pillows to make your home all that more personal and beautiful.

Henri Cartier-Bresson….an inspiration

One cold, dreary, winter day in Detroit, MI my husband and I found ourselves looking for something to do. What else is there to do on a day like this but go to the museum. The Detroit Institute of Art Museum is a can’t miss! It was, however, the year that it was rumored that the city would have to sell some pieces in order to pay the huge bills that the city had accumulated (thanks Quami).

So, with that in mind, we wanted to go to the museum; in case it was our last chance. It truly is an amazing place with great artists’ work exhibited throughout the whole museum. We spent six hours touring the displays, and you still can go and enjoy it too because the museum didn’t end up having to sell a single piece.

While in the photography exhibit I came across a photo of a little boy carrying two huge bottles of wine. His face was full of pride and the little girl in the background is looking at the boy with either joy or amusement. This picture by Henri Cartier-Bresson simply makes me feel happy. There isn’t a print available for purchase so I took a picture of it with my iPhone with the plan to replicate it with quilting.

I took my iPhone picture to Fedex-Kinkos to have the picture blown up to a huge 64×54 inch photocopy. It was printed on architecture paper and cost $11.00. I traced the face onto freezer paper using a light box. I then numbered the different sections based on light value, 1-9. I have my fabric already purchased and I also pre-numbered them according to light value. 1, being very dark to 9, being very light.

Next, I cut out the pieces and started to glue them down onto muslin. The eyes were very hard for me to complete. At first I thought I would just paint them, but, I decided to fussy cut the fabric to make the eyes as perfect as I could get them.

I continued my work to his body and then to the bottles of wine. Once completed, I then had to decide on the background. I wanted to give an impression of a building with a blue sky background. I also decided that the orange/red sweater gave too much contrast so I muted it down with red bridal tulle. I also ended up muting the contrast-y face down with a white bridal tulle.

So, here he is ⬇️. All glued down and ready to quilt. He will be my second portrait I will quilt. I decided to watch a few more YouTube videos on portrait quilting and off I went!

I started out using invisible thread, but that wasn’t working out too well, so I switched to white for his face, dark brown for his hair, red for the sweater and so on.

Completed, “Little Henri” hangs in my living room and measures 64×54 inches.

He makes me smile 😊

Gustav Klimt-an inspiration

In 2015 I was in Paris,France! Such an beautiful city, it’s no wonder that so many artists come here for inspiration. I was on my honeymoon and we wanted to see and eat everything! We visited the Louvre and the Pompidou. On our last day we were planning to go visit the Musee d’Orsay but it was closed! It was quite upsetting because we wanted to see their extensive collection they have of Van Gogh. Oh well, better planning next time. We decided to walk the streets instead near the river Seine. We started to see posters of Gustav Klimt’s Judith and the Head of Holofernes. We couldn’t believe our luck, there was a gallery nearby that was displaying some of the works of Klimt and it was open! It was amazing, but no pictures allowed, so we took our time in order to absorb all that was Klimt.

This next quilt is an inspiration of Klimt’s Woman in Gold.

I started by making round felt flowers for the background. They are are individually embroidered and beaded. I used about 50 felt flowers in this piece. I did most of this work while watching Netflix’s Orange is the New Black

I went online and printed a black and white the painting Woman in Gold and started the portrait piece. For this portrait I blew it up to about 12×24 and pieced it together as it came out on 4 pieces of 8×12 sheets of paper. I traced it onto freezer paper and started to piece it together.

This one was my first portrait piece so obviously I’m very nervous about sewing the face to make this woman come alive, also this is my first attempt at free motion quilting! I watched several quilting videos on YouTube on quilting portraits, so with a glass a wine to steady my nerves I started the needle to thread to fabric.

I think it came out all right

So here is the final completed work. There is a little beading around the eye and to her collar. I painted the pupils in with acrylic paint. The felted flowers are glued down. It measures 26×35 inches. I call it “My woman in Green”

My Picasso Pillow

1CCCE456-8328-4D39-A673-8D25CB4104A7So, my husband is Argentine and we find ourselves back in his country (or more specifically in the federal capitol of Beunos Aires) at least once a year to visit his family and friends. While visiting we will make it a point to visit one of the museums or art galleries.  In 2016 the Museo de Moderno de Buenos Aires was having an exhibit of Pablo Picasso selected drawings.  I had my favorites, but I especially loved this one ⬇️  I don’t know what it’s called, but it called to me. 7F352349-0A8D-4275-8E60-92B3B1ECC784
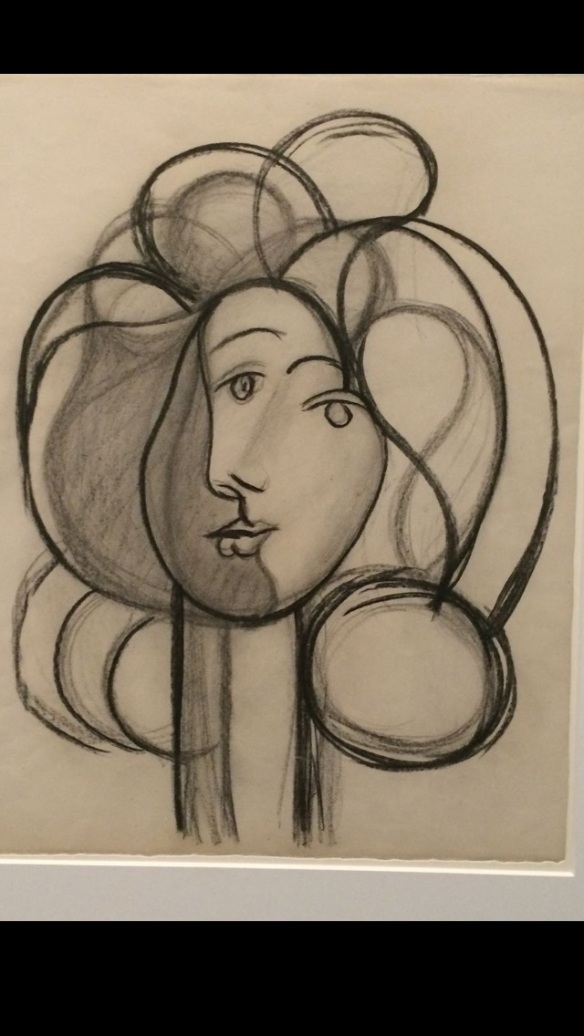
When I got back to the States, still inspired, I started quilting. I didn’t want it to be a big piece, so I decided to make a pillow. The first step of this process was to draw the image out onto freezer paper to make my pattern.

3DBF233B-7BFD-45E3-94CE-011D66D7B835

As you can see in the above picture I numbered each piece and put hash marks to indicate how the pieces line up with one another. There is fusing on the back of each piece.

EC5CBCB8-8005-40C4-9852-1D29046385BB

Here I have my pieces sewn together with raw edges. The fabric I used was cotton I purchased as fat quarters.  My intention was to make it lined with black yarn, but it wasn’t working out too well.  I went to JoAnn Fabric to see what I can use instead.  I came home with black bias tape and a wonderful rose red fabric!

53933B29-BB63-4633-97E3-DA007972A25D

The bias tape worked very well as long as I pressed it along the lines before sewing it down.

It was coming together nicely, but I just didn’t like the lips. After a few changes the pillow was done. I added the fringe which, in my opinion, adds so much to this pillow.  It sits in my living room and it is quite the conversation piece.  I love it 💗

1B619BE3-BEEC-42ED-B7CB-36077C6F2067